Showing posts with label DIY. Show all posts

Wednesday, February 5, 2020

DIY Coat Conditioner

One of the many new routines I've developed since bringing the horses home is regular use of a coat conditioner. When the horses were boarded and on 24/7 turnout, the use of a coat conditioner wasn't a priority for me. My horses were completely covered in mud for so much of the year that using coat conditioner would have been like putting lipstick on a pig. It'd have been nice for the time I was there, and then would have been promptly reversed when I left and they ground mud deep in their coats again.

I really looked forward to bringing the horses home to a more controlled environment where they'd be mud free. However, despite the lack of mud, the dry lot contributed quite a bit of dust to their otherwise clean coats. This dust dried out their coats and gave them a dingy appearance.

In an effort to offset the effects of the dust and stay budget-friendly (because horses are expensive, yo), I scoured the internet for DIY coat conditioner recipes. I modified what I found to my own tastes and settled on the recipe below. It's shockingly affordable, smells great, and works just as I hoped by putting life and shine back into the horses' coats all while helping to repel dust/dirt. Added bonus? The horses love the extra quality time spent grooming.

DIY Coat Conditioner

You will need the following ingredients and one 16-oz. spray bottle. Cost per bottle ~$1

The essential oils could certainly be modified to suit whatever scent pleases you. 

At ~$1 per bottle, this conditioning spray is stupid affordable. Purchasing all of the ingredients off-the-bat only cost me ~$45. As far as budgets go, I imagine this would be well within most people's. It also doesn't take any time to throw a new batch together. I've got all of the ingredients in my tack room and simply toss each into the bottle when I run out. It seriously takes me 2-3 minutes MAX to make. And I love how good the tack room smells after!

Let me know if you try it out!

Tuesday, December 26, 2017

Trailer Facelift

Part of the reason I haven't traveled hither and thither with my horses as much as opportunity presented itself over the past few months was because I was in the midst of some various trailer facelift projects.

Well, those projects are FINALLY COMPLETE and it's time to chronicle the process for posterity (but mostly my own memory).

20170220_145945
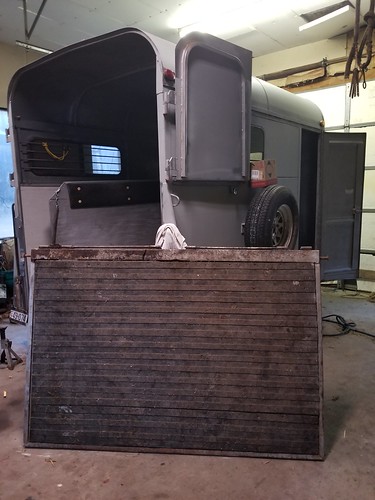
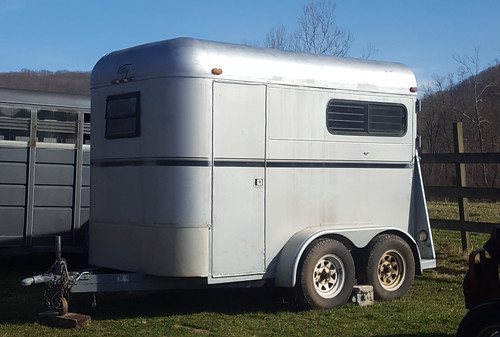
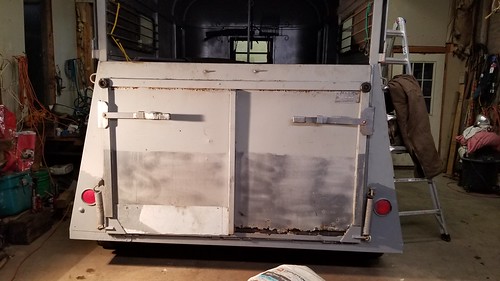
The before, variability in the paint color/thickness not as evident in this photo
20171222_083839
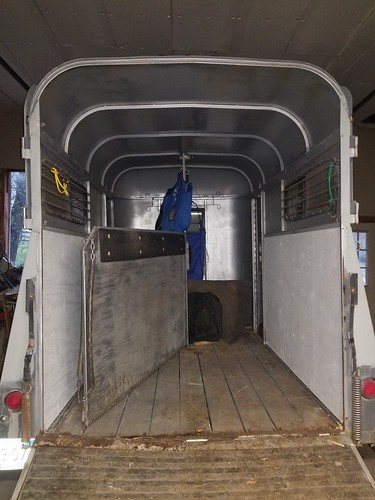
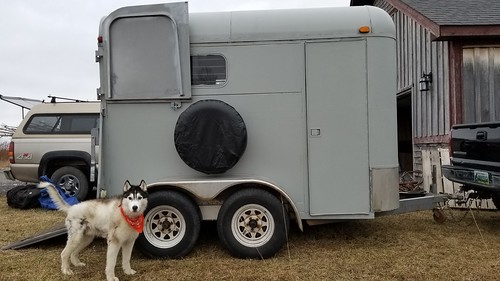
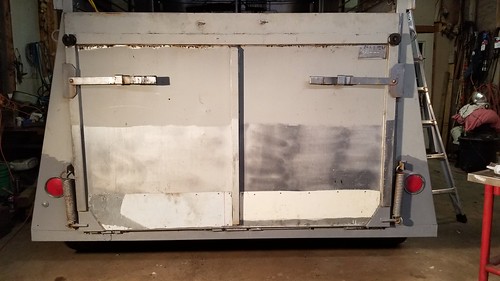
After, (inside of Dutch door still awaiting fresh paint; winter arrived and stalled painting process)


A Bit of Buyer's Remorse & Steps Toward a Solution

When I purchased this little trailer in February, I knew it would need a little work over time. By and large though, for a 23 year old trailer, things looked great. The floor was in phenomenal condition and the frame was super solid with very mild surface rust after so many years. These two things are very important to consider when purchasing a used trailer, so knowing they checked out was important to me.

However, to help guarantee further longevity of the trailer, I was prepared to do some critical maintenance work. Primarily, buffing of rust and application of a fresh coat of paint to slow the inevitable rust process that occurs on the east coast due to rain, humidity, snow, and salty winter roads. I've got lots of experience buffing and painting after numerous DIY projects through the years, so this seemed very doable.

Except after the joy of the initial purchase wore off and I looked at the trailer with fresh eyes, I realized I missed one thing...

20170220_142008
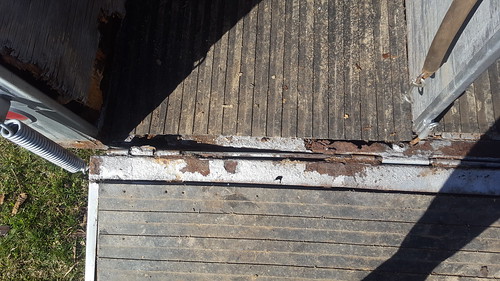
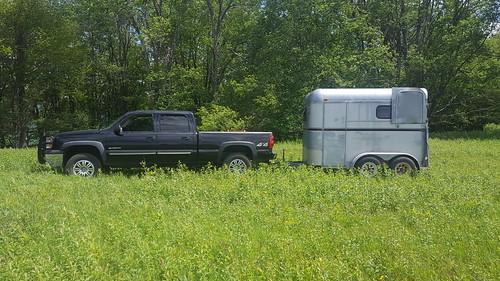
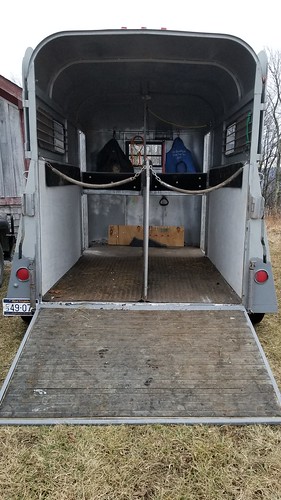
From above, you see the rust but the issue isn't that evident...
20170220_142429
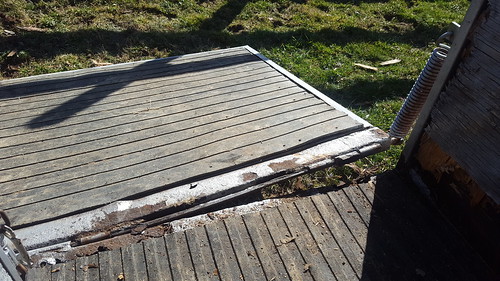
But from this angle, which accentuates the problem best, you can definitely see the problem!

Yeah... That ramp definitely shouldn't be that way!

I beat myself up about it for a little while, but realized that it was just a learning experience that I needed to get through. As my BO has told me time and time again for various situations that I fret about, "Worse things have happened to better people." Or, in other words, it's not a big deal, calm TF down.

And so I set to researching what exactly needed to happen to correct the issue and then began seeking help. Right away, I was guided to our local high schools shop classes. They're always looking for learning projects. The work won't be the quickest or the prettiest, but the labor will be cheap. With an older trailer, I already accepted that pretty wasn't necessary, so I dropped the trailer off.

Well, long story short, they never got to the trailer before the summer break. They told me to bring it back in August and it would be their first thing, but I was Over It at this point.

Fortunately, my neighbors jumped in at this point and let me know that our friend Chuck was a very skilled welder and could do the job for me! Excellent. Except, well, if you know Chuck (and really, if you know any Canaan Valley person), you know things don't happen quickly.

I just accepted this slowness for what it was and didn't let myself worry about it. I knew he WOULD get to it and he WOULD do a good job and it would probably(?) be done before the end of the calendar year.

While I waited, I was cautious about hauling and loading and unloading my horses if they were on that side. I'm very fortunate to have horses who are very good about trailering and knew that for a limited time, things would be okay so long as I was conscientious about unloading them as that was the only time that cattywompus ramp could really cause an issue as there were no sharp edges exposed, it was mostly just a trip hazard in the interim. And honestly, for my horses that were used to a step-up trailer, that little 2-3 inch warped ramp area was nothing.

20170910_095820
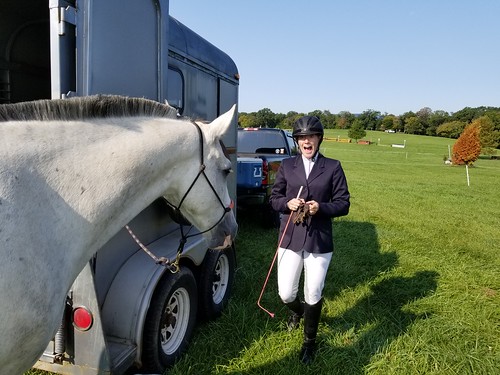
Evidenced here, Janky Trailer @ Loch Moy in September


But First, A Fresh Paint Job

It's not evident in many of the above photos, but the paint was irregular at best. Over the years the owners had spray painted areas of surface rust with a variety of gray-silver paints. While this protected against further rust formation for a temporary period, it resulted in the trailer looking rachety as all get-out.

Originally, I figured I would paint the trailer after the ramp was fixed. However, as Chuck was picking away at to-dos with the trailer as they fit in his schedule, he recommended I buff and apply primer on some areas to prepare for the work he would complete.

The weekend I set aside to complete this task corresponded with a beautiful unexpected opening in my schedule - by various strokes of luck, I had NOTHING scheduled.

So, logically, I bought a gallon of primer and decided to "see how far it would go".

Result? Basically the whole damn trailer!

IMG_20170916_133837
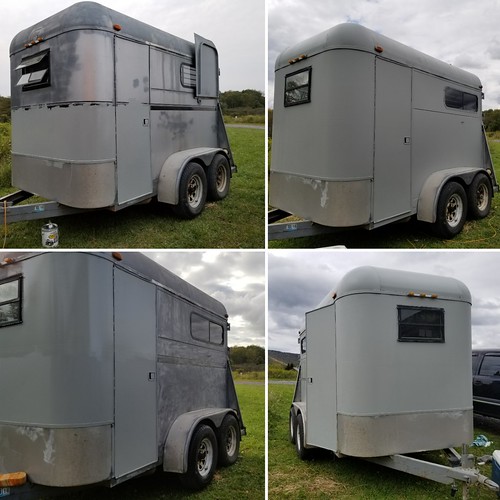
The upper left demonstrates how irregular the paint was.
The lower left looks worse in unpainted areas because I'd buffed them with a metal brush on a power drill.
Right side photos show the completed [primer] paint job, though the final coat won't be much different in color.
20170916_133545
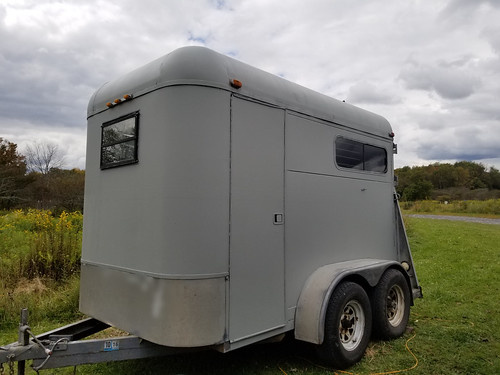
Not the most professional of all paint jobs, but way better looking than before! Now it needs a
navy stripe and some reflective tape accents to help with night time visibility.
20170602_145926
Irregular paint evident here...
20171013_170338
Ah, much more uniform and well protected for several more years against oxidation-reduction -
an inevitable process you must be prepared to battle when you live in the wet & snowy east!

I even clambered up onto the roof like a responsible painter and put the requisite coats on it!

The only place I didn't buff and paint was the base of the trailer ramp where I knew more work would be done.

20171202_121151
No need to paint this area! Much work to be done.

It was a ton of work, I won't lie. Buffing the damn thing was the hands down WORST, but good tools and sheer determination helped me get the job done. It's not the most professional paint job ever, but it's a freaking 23 year old trailer - any paint job was an improvement at this point and I'm all about form and function before beauty when it comes to these things.

The most important thing is that the trailer now has a good protective barrier to road salt and moisture. Rust will be slower to form for several more years, a good thing when you live where I do!


The Real Work Begins

As summer faded to fall and fall cooled down and rained a bit, Chuck's schedule finally lightened to the point where he put my trailer in his shop and began work.

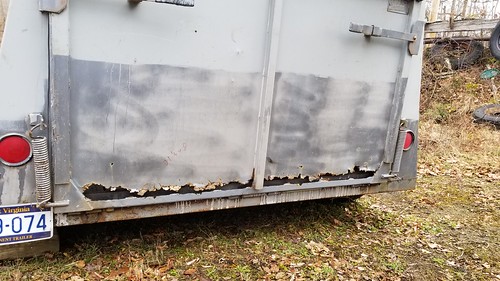
First thing was first, patching up the metal along the base of the stalls behind the tires where road salt had eaten away at the trailer.

20171025_173850
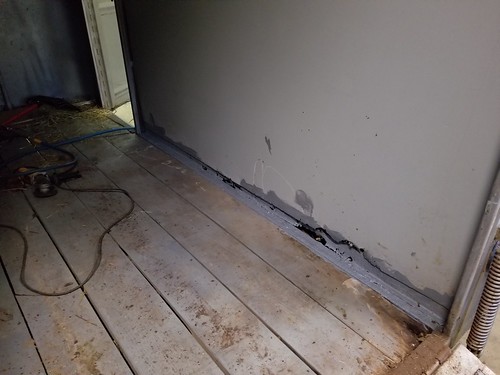
Inside the trailer where the plywood typically sits; bottom of the metal rusted out.
20171029_174300
White strip is new metal that was cut, drilled, and caulked to protect this area from future moisture/rust.

From there, he painted and installed new plywood.

20171029_174310
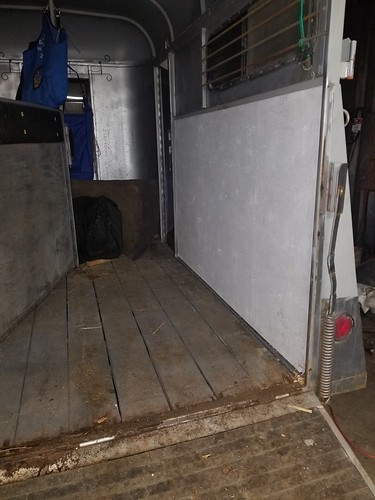
New plywood installed back in it's proper place. Bumpers not yet installed.
Old plywood was rotted along the back corner where the trailer had at one
point sat under a gutter and gotten soaked: cue rust and rot!
20171029_174320
New plywood installed; rusty, warped ramp visible here, though you can see
that that left corner really isn't that dramatic in the grand scheme of things!
Still, it's better it was addressed once and for all as it only would have worsened.

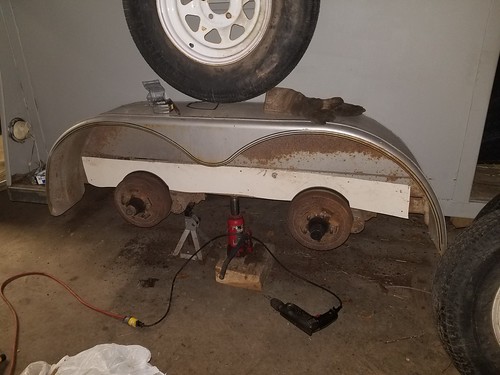
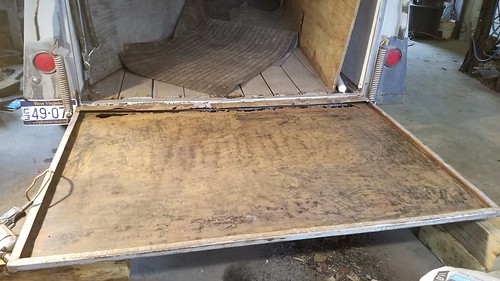
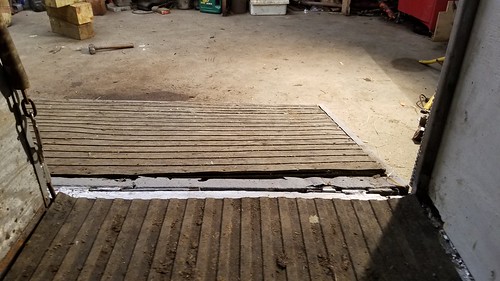
And then took the ramp off to begin working on that whole debacle.

20171101_173005
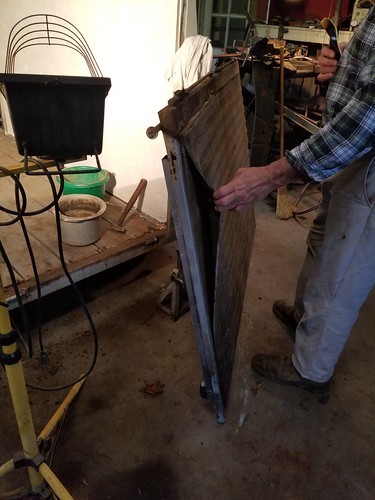
Discussing whether the plywood under the ramp mats would need replaced.
Spoiler: it didn't! It was in great shape.
20171101_180653
Ah, hello there problem child!
20171101_180708
Miraculously, the ramp wasn't warped that badly from where the hinge
rusted off allowing the spring to pull it upwards and askew from the trailer.
20171101_180705
If you look closely, you'll note the left-most hinge missing completely. Lovely!

Chuck is an absolute WEALTH of knowledge on this type of thing and I enjoyed hearing how the process was going as he set about it. The "hinge" on the ramp was definitely NOT factory-built. It was some sort of repair somewhere in the trailer's lifetime and it was done piss-poor which is why the whole thing ended up the way it was when I got it. Basically someone drove a hexagonal bar through the hinges and called it good. It wasn't done well and resulted in one hinge rusting off of the frame resulting in a warped ramp.

Chuck's repair of the thing put it back to what it should have been - three independent hinges.

20171222_083702
The original problem child looking much better!
20171222_083707
The rest of the hinges along the ramp post-work


Final Steps

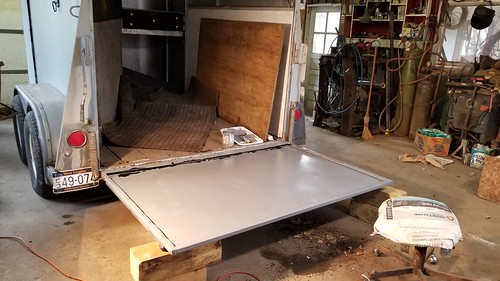
Putting the ramp back together was a bit of a process, but not too bad in the grand scheme of things.

I first prepped and painted the ramp where the plywood would go to further protect against future rusting, and then we fit the plywood back in, I screwed the mats on, and that was that.

20171209_131343
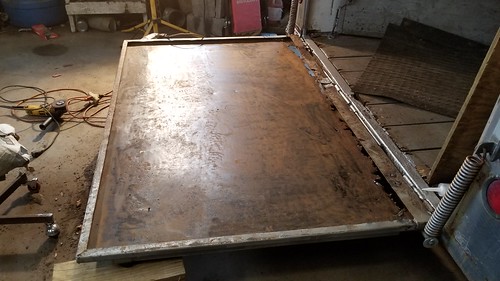
Partially buffed in preparation for paint.
20171209_131349
Buff job complete.
20171209_134502
Painting complete.
20171210_161006
Lining up the plywood to be screwed back in was a bit more complicated than it looks!
20171210_183607
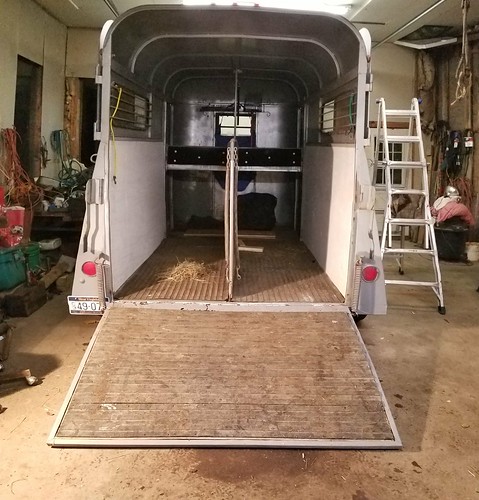
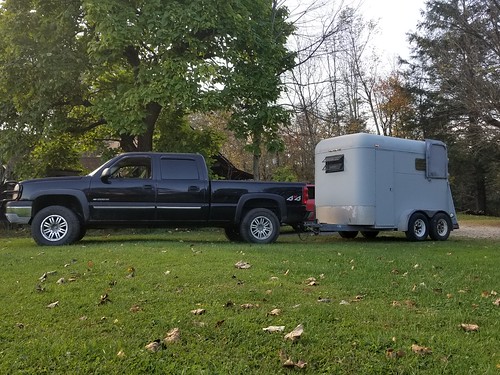
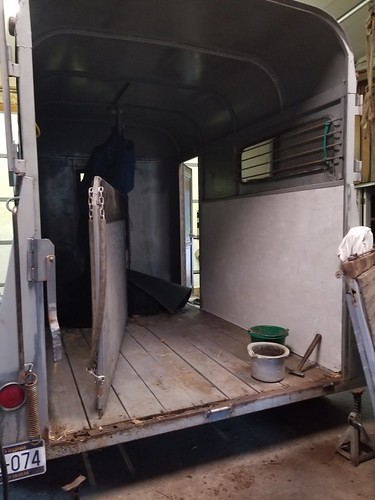
Bada-bing, bada-boom! A STRAIGHT ramp!
20171210_183624
How lovely this is to look at!
20171210_183631
No more rusted off hinge and warped ramp

We also patched up the sheet metal on the outside bottom of the ramp, too, to protect from further rust damage. Or I guess I can say that I patched up the sheet metal on the outside. Chuck cut the pieces, then instructed me how to caulk them and screw them on.


20171210_172434
Left side patch caulked and screwed on...
20171210_181622
And now the right side! All it need is a final paint job to neaten up everything!

What a process!

I still plan to add a final coat of paint to the whole thing with a sprayer - and honestly planned to have that done prior to sharing this post - but it will have to wait for warmer weather, which is hard to predict this time of year.


Conclusion

Could I have spent some more money or taken more time to find a better trailer? Absolutely! But you know what? At my price point, I did pretty damn well for myself and even with all of the extra work, I still couldn't have found a nicer trailer within my budget.

It was a lot of time and effort to flip this thing into something prettier than it was, but I have learned a TON from the process. And honestly? I really feel like I'm better off for having put in the hard work myself to make so much of it happen. I'm much more familiar with this hunk of metal on wheels and feel good about hauling my horses in it. Additionally, if a day comes that I want to upgrade to a better/bigger trailer, I have a much better grasp on what I'll be looking for and considering. Knowledge is power.

20171222_083653
All that remains is a final fresh coat of paint and a better
organization system for storage!

I'm really pleased with how everything turned out. I plan to add some additional minor upgrades to the inside so far as hanging hooks and saddle racks, but that's child's play considering everything else that has been tackled to date. I'm also playing with the idea of painting some fun little caricatures of the horses somewhere, too, we'll see!

: : : : :

Have you ever flipped, renovated or given a facelift to your trailer? I know some of you have shared some blog posts here and there on the subject. I'd love to hear your stories if they haven't been documented yet. Or maybe you've chronicled some trailer improvements already and they're archived in years past on your blog?

Wednesday, May 17, 2017

Deadly Appalachia Fly Spray Recipe

Well, after several of you called me out on the bragging I did about my fly spray yesterday without *gasp* sharing the recipe with you, I've decided to share the recipe with the world. It probably isn't monumentally different from other homemade sprays out there.

Credit where credit is due, this is not my recipe, but one my BO tweaked over the years until she was happy with it. She uses her name in the title, but in the advent of privacy, I've modified the title. This recipe battles the bugs in our temperate Appalachian rainforest environment beautifully! I've been using it for 6 years now with wonderful results - it's definitely better than any store-bought I've tried.

While the recipe can be made without the permethrin, I will tell you from experience that it won't be as effective. My BO is a medical professional and did some research into the toxicity of it in this recipe because so many people cry foul at chemicals these days. She noted that while yes, it can be toxic, in the amount we use it on the horses for the number of months we use it, adverse effects wouldn't start occurring until >40 years of use. Considering the average horse lifespan, we're in the clear! IMHO, I'd rather give my horses some relief from the present-day pain of biting insects than worry about adverse effects that are 40 years down the road.

: : : : :

Deadly Appalachia Fly Spray Recipe


Makes 1 quart.

Ingredients
  • Empty, clean fly spray bottle
  • 3 tea bags (Earle Grey is best) – omit if horse is white (I have never omitted and have never had an issue with it staining)
  • 3 bay leaves
  • ½ tsp. coarsely ground black pepper or peppercorns
  • 3 large cloves garlic - mashed
  • 1 cup white vinegar
  • 2 Tb. lemon juice
  • 6 oz. Pine Sol cleaner (off name brand okay as long as it has pine oil in it)
  • 4 oz. Avon Skin So Soft (if none, get off name brand baby oil with lavender)
  • 10 drops lavender oil
  • 6 oz. Listerine (off name brand okay as long as it has the eucalyptus in it)
  • 2 tsp. Citronella oil
  • 4 oz. concentrated Repel X or 2 oz. 10% permethrin (available at Southern States)(can leave this out if you're anti-chemical)
  • Funnel (optional, but helps greatly)

Directions
Boil the tea bags, bay leaves, pepper/peppercorns, and garlic in 2 cups of water until it boils down to about ½ cup of liquid. Cool to room temperature and strain well to remove any solids. Cool completely! (If you don't strain it well it will likely clog the spray bottle head. I usually strain 3x to make certain I've removed even the tiniest of sediments. Additionally, my tip is to make a double or triple batch of this step so that you can keep it in a closed container in the fridge for more batches later. It is definitely the most timely step in the whole process, so having some on hand later when you need it saves a lot of time!)

Once the above mixture is at room temperature, add the remaining ingredients to the bottle. (I have not found that the order they are added makes any difference at all, so long as everything is room temperature.)

The active ingredients in the permethrin are destroyed by heat, so make sure everything is at room temperature before you mix it all together. This mix works well without the permethrin, but doesn’t have the “staying” power as with it. The cost is about $3/quart without the permethrin and about $4.50 with it.

Contents will settle, so shake well before using.

: : : : :

Comment and let me know how it works for you! Or, if you have your own recipe, how does it compare to this one? 😉

Wednesday, June 8, 2016

Just Call Me MacGyver

Horses are an expensive hobby. We all know this. And I'm your run-of-the-mill 20-something who lives life on quite a strict budget to make ends meet each month between bills, feeding myself, and taking care of the animals.

To help alleviate costs, I MacGyver shit whenever I can.

On the endurance front:
  • Needed a saddle cart for endurance...those suckers run close to the $200 bracket. I crafted one for $50. 
  • I love my saddle, but it did not have rigging for breastplate or crupper attachments. I crafted those from spare things around the barn and my craft bin for free. 
  • My knees and ankles were experiencing undo stresses from the lack of stirrup turners. Stirrups with an offset eye are expensive and hard to find in the caged, padded endurance variety and the other option, commercially made stirrup turners are costly and the design looked like it wouldn't work for me. So I once again crafted myself some from spare things for free.
  • *Not MacGyver'd* but still worth mention, I recently contracted a leather maker to help me resolve my stirrup leather issue after the thin leathers caused a lot of pain in the soft tissues along my shin. The gentleman I contacted knew just what I needed and made me custom tunnel-backed fenders! 
 On the jumping/dressage front:
  • Using mule tape, rope, and cones coupled with a civil engineering measure wheel, I have my own dressage arena. 
  • I scavenge PVC pipes from wherever I can to add to my ground pole/jump pole arsenal. I have six 10', three 8', and three 5' poles now that can be paired a myriad of ways with my 3 jump standards (by Mike Turner) and cavaletti that an ex helped me make.
Horses on a budget y'all.

I'll do a post at a later date on the jumping/dressage stuff, as I have no good photos right now and no time to get any pre-OD 100. 

---

Saddle Dolly

About a year ago, I Googled "DIY saddle rack/DIY saddle cart" and found a lot of interesting images. A lot of them required a lot of wood and a lot of craftsmanship and would result in a rather heavy product. I'm crafty and I date a general contractor who has the skillset to do these things, but the time and materials needed for most of this stuff was not going to make it very worth it in the end for what I really needed - something to make toting my saddle/bridle around ride camp and holds a lot easier.

One design however, really caught my eye. It was a handtruck (I call them dollies, it may be my WVian coming how, but whatever) with a metal saddle rack clamped onto it. Hmm...that got my brain whirring. This idea would be very affordable and very easy to implement IRL. It may not be as stable in all conditions as a cart would, but it will work in 90% of the situations I'll need it for!

It took time (and really, the impetus of a 100 mile ride with all away holds), but I finally ventured forth to Harbor Freight and purchased a dolly for $42. It's rated to 600 lbs and has great "off road" tires on it as opposed to many that lack tread and are meant for use in a more urban industrial setting.

I had zero plans to use the original idea of a metal saddle rack as I knew I had a perfectly good wooden one that had originally been crafted to go inside my tack locker, but I never use it in there. I purchased some U-bolts, scavenged a board from the burn pile at the barn, bolted the board to the top part of the dolly, and then hinged the saddle rack to the board. I added some hook & eye gate latches to hold the rack in the upward (usable) position, and voila! A portable saddle rack!

Things I will also be adding, but haven't as of this writing: hooks for bridle/reins/breastplate and a muck bucket at the base that will be bungeed in place (and can hold sponges/scrapers and water). The bucket should make it even more stable.

20160602_172621
Totally already have stuff hanging off of it. 

20160602_172615
U-bolted to the dolly and hooks to bring the saddle rack to the UP position

20160602_172608
Hooks engaged!

20160602_172605
Plenty of space to bungee a muck bucket with water @ base

20160602_172551
Wheels the saddle around like a champ!
Still need to add a few more hooks for bridle/breastplate


Saddle Rigging

Originally, all of this rigging was done with rings and paracord. However, the crupper ring really needs to be a solid placement, and paracord is not static line. In the rope world, you've got static or dynamic ropes. Static do not stretch (especially useful for those who are arborists) and dynamic have some give to them (we use these in the rock climbing world because when you take a fall you don't want to get jerked to a hard, sudden stop). I obviously don't want my saddle to stretch away from my crupper, so I needed to resolve the issue.

Enter biothane, a very static material!

I bought a lime-green sponge leash at the AERC convention several years back. It was a sponge leash for a year, then I cut the stitching and it became a throat latch on a bridle of random biothane pieces for Griffin. And now, it's undergone another Frankenstein operation to become my crupper attachment! This final transformation involved some additional conway buckles and drilled holes into the biothane, but overall, it seems to be a great design.

20160602_172059
New crupper ring. You can see original stitching (near) vs. the bigger loop that goes to conway buckle (far)

20160602_172056
Zoomed out to show positioning.

20160602_172133
The biothane goes under the saddle to loop up and hook
around the stirrup bars. The yellow paracord also hooks
around the stirrup bar, as well, and this is how I attach
my breastplate to the saddle.

Stirrup Turners

Ages ago, Nicole had purchased some commercial stirrup turners. She noted (as other on online reviews have also said, I've noticed since) that the hardware used to make the loop dug into her ankle and ultimately created a new issue even though it solved the original one.

I started turning over ideas in my mind for how I could craft stirrup turners of my own that didn't include any hardware that could dig into my leg. It would need to be minimalistic, too.

I settled on tubular webbing with a segment of a dowel rod for rigidity slipped inside, and then sewed with heavy duty wax thread. (Okay, the original design involved velcro, but that obviously didn't work.)

The inevitability of mud and dirt does weaken the threads over time and I have had to resew a few times, but overall, I'm really pleased with the design. If I had access to an industrial sewing machine, these would easily be improved and far more bombproof, but alas, I have no such access and I'm pretty certain my mother would shoot me in the foot if I tried to do this with her machine (which isn't quite rated for this type of thing)!

I've been using these things for about 2 years now and have had to repair (resew) one or the other 3 to 4 times during that period. Not a bad go of it, really, when you consider the # repairs/time period. Considering they literally cost me nothing to make and they've completely resolved the issues I had prior to their existence, I'm psyched with them.

20160602_172237
Tubular webbing, dowel rod on top through Wintec webber

20160602_172231
Hand stitched below.


Tunnel Backed Fenders

I've struggled with pain in my lower legs from endurance riding more than any other kind of soreness. When I've ridden in other people's saddles that have wider stirrup leathers (Jen's Boz for instance, which has a 2.75" wide leather) I didn't even have a tickle of pain like I'll get from my saddle. I have tried padding out the lower half of my fenders with pipe insulator and fleece sleeves to hold those in place, but ultimately, it was too much under my leg.

No Frills this year was The Worst. Around mile 9 something across my right shin literally felt like it *snapped*. Not bone, but soft tissue. I had very sharp, severe pain in that moment that lasted for quite awhile. (I had the pipe insulator nonsense going on at this ride.) At the hold, when I could finally inspect my legs closer, I found a ridiculous amount of swelling and edema from the medial aspect of my leg across the front of my shin on my right leg. Whoa... I've never witnessed that kind of edema on my body before. It was pretty crazy. I suspect my high socks may have played into it! (My change of clothes included an entirely new wardrobe that had ankle socks instead of high socks at this hold.)

For the rest of the ride, my right leg would plague me. After that initial snap of pain (a 7 or 8 out of 10 on the pain scale for me), the pain would remain around a steady 3-4 on the pain scale with occasional spikes to 5. We took a lot of walking/grazing breaks though for the rest of the ride, which helped a lot. The rest of the time, I relied on my sheer stubbornness and desire to finish. the. ride. to get me through. I knew being able to finish was the only thing I could do to resolve the issue because being OUT of the saddle and on the ground was the only thing that resolved the pain.

Post ride, I had impressive swelling on that shin and even now (6 weeks later) I still have a slight deformity (bump) on my shin that was never there before.

Obviously, I HAD to resolve the issue before my 100...and the rest of my endurance career! Riding with pain BLOWS.

I reached out to a leather craftsman in Indiana who'd been recommended to me by Austen. He'd made a rolled leather collar for Kenai earlier this year that I love and is known for stirrup leathers, so it seemed like a great place to start.

After some conversations about the whole ordeal, he told me tunnel backed fenders would be the best bet. Within 10 business days of my custom order, I had them! And so far, they've been absolutely amazing. I love them. The 100 will be the ultimate test, and I'm very optimistic we'll get along just fine!

20160602_172206
Love them. You can also see how the stirrup turner plays into the whole picture.
You can see that I've used and abused these fenders some already! I need to polish
everything up pre-100. 

---

There you have it! Some of my endurance-based MacGyvering.  

If anyone copies any of these ideas, I'd love to see photos of your rendition!


Have you MacGyvered anything of your own for equestrian purposes?