Showing posts with label crafts. Show all posts

Wednesday, May 25, 2016

Whirling

Firstly: Thank you for all of the compliments on my new header! I have been plotting and scheming and photoshopping for a long while. Each of the silhouettes (except for WV and the Siberian) are directly from photos of me. Some are a combination of two photos as a true side profile shot is not often taken when you're participating in faster-moving sports! This blog has a central focus on the horses, but I also share a lot about my adventures, so I wanted the header to represent those, too. I'm really pleased with how it turned out for the most part. =)

Life is whirling around me lately. I'm stupid busy (shocking, I know). Monday through Thursday I wake up around 4:45a and my head doesn't usually hit the pillow again until 10:30p. During that time period, I'm only HOME about 3 hours, maybe. It's kind of crazy. And I kind of need to slow it down just a titch. But probably not for another week.

Currently I am:
  • Working my typical 10-hour day (I always have 3-day weekends).
  • Giving an absolute wealth of riding lessons this week (and probably next) for girls who are prepping to take a horse they just met (he's a VERY good boy) to 4-H horse camps. All are doing very well.
  • Squeezing in short workouts with Q that are either HIIT hill sprints, dressage, or nighttime riding.


The above is my snapchat story from a night-ride last Thursday. After the first 10 seconds it's all video. We did 5½ miles in an hour. Went out for more of a mental ride than a physical feat. Q was a demon on the return home and I spent a lot of time yelling, "WALK DAMNIT! WALK." She did better with the dark than I did. ;-) The only spooking moment was when she stepped over a stick in a funny way and it moved in a manner that touched both of her hind legs. OMG MONSTER, PANIC! *rolls eyes* So that was a fun 5 seconds of manic waltz-leaping to deal with. Overall, a very nice ride and definitely good practice for me. (I do believe I may need Dramamine for the nighttime loops of the 100 as it is kind of vertigo-inducing, something I haven't really experienced before! Funny how simple things bring about that kind of reaction.)


And the above is a clip of our hill sprints. It doesn't quite do the pitch of the climb as much justice as it could, but it's a good representative of how long our sprints are. She's going about 20 mph here and this isn't even the entire hill! There's about 200 feet more at the top that we didn't do and I started the video about ¼ of the way up from the bottom of the hill. She did 5 reps last night. I plan to taper her down to only 3 reps next week. 5 reps last night with a micro dressage warmup (read: Q blowing through all aids in an effort to try to go back to the barn) and the total ride was about 40 minutes (I hand walked her down the hill and half way to the barn on the way back). At most, she has done 10 reps on this climb and she had to trot the last ones. We did 7 last weekish and she was spent after those. She really gives them her all. And I always dismount after the last one, loosen her girth, and handwalk her down the hill and partway to the barn, stopping to snatch small handfuls of grass and feed her along the way. Even when she is absolutely huffing and puffing like a steam engine, she has an appetite which makes me happy to see because I know she feels good even though she's out of breath from the sprint.
  • Squeezing in some workouts with Griffin, also, though not so much my focus as I know I'll have time to ride him more after the 100 is over.
  • Going over all of my logistics for the 100. I spent a summer running logistics for wilderness trips (and I'm naturally a list maker and an anal planner), so I know a thing or two. I spend a lot of my daydreaming thinking about what is going to make the experience easier. I totally accept that I cannot control a lot of how it will go, and I'm not planning for that kind of thing much at all. But I absolutely CAN plan out gear and food and supplements and maps. 
    • MAPS! I love maps. I have taken the 100 and mapped it out by hand with my spatial analysis programs so I have a better idea of how the course unfolds. I can't preride it all, but I don't have to go in totally blind! (Through past OD rides and No Frills I've physically ridden 50-60% of the course.) I have a very good idea of where the worst climbs and descents are, how long I'll be climbing or descending, and over how many vertical feet. I know where I'll be on fire roads/Forest Service roads and where I'll be on singletrack trails. (Fun fact: over half of the OD 100 is on trail that qualifies as "road" meaning it is wide enough for a 4-wheel vehicle to traverse. It could be dirt or gravel, but it's definitely wide. Why is this important?  Because it correlates to easy footing in the grand scheme of things!)
  • Crafting! I've been crafting a lot lately. Mostly gifts for friends, but it's an idea I've wanted to implement so badly for so long. I have also crafted a handtruck saddle/tack rack for endurance rides (the carts are so expensive and this thing has only cost me about $50 to create). And the other horse-related craft I've accomplished is sewing pockets onto my Kerrits Flow Rise tights to make them more similar to the Kerrits Ice Fil tights that everyone loves so much. Yeah, I don't have the sticky seat that the Ice Fil have, but that isn't the biggest selling point on those breeches for me. The POCKETS are. And I couldn't justify spending another $70 right now on something I really don't need. I have 5 pairs of breeches (1 fleece winter pair and 4 summer pairs, two of which are Kerrits Flow Rise) that are all in great condition. So, instead of spending money, I recycled some old tech fabrics to sew pockets onto what I had! My sewing skills are mediocre at best, but I'm really pleased with how it all turned out. (And if I ever decided I absolutely hated them, I could easily use a seam ripper and pluck the pockets off without compromising the tights.)
IMG_20160522_211143
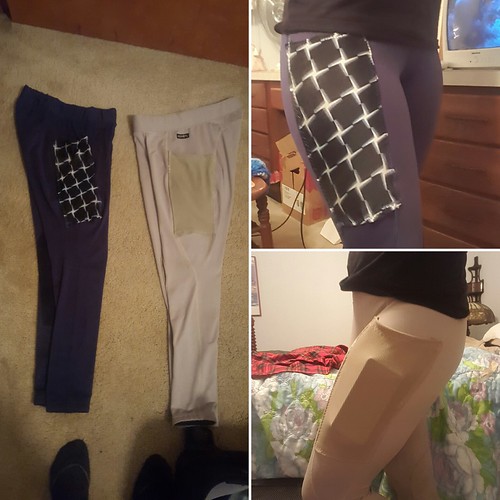
Khaki fabric is from retired pair of breeches that were janky as hell. Black/blue fabric is an old swimsuit.
I have about 20 of these from my competitive swimming days, the elastic is shot, and various other areas
are worn and stretched out, but I kept them because they made great drag suits (worn over a fitted suit)
for workouts. And when you're in the water 5 days a week, you need to have the option of multiple suits!
Add 5 days a week to 10 years of swimming (yes, I have suits reaching back to the very first days -
they became drag suits), and that's a lot of suits!


And basically, that's my life in a nutshell lately. Whirling chaos that is spinning about in a fairly controlled fashion. But that's [mostly] okay. I know I'll slow down after the 100 (and these 4H camps) is over. For now though?


Sunday, October 20, 2013

How To Tie Your Own Rope Halter

Q modeling her halter-bridle I tied
(Links to Jen's site updated 11/15/2016)
Tying your own halter is a hot subject among many horse folk, sadly, this art is complicated and resources are far-spread on the internet. I posted a few weeks ago about my time as an Equestrian Martha Stuart to save money on things I "needed" for my horses. I received a few inquiries on that post about how-tos. Also since that post, I taught Saiph to tie halters in the manner I've taught myself through various internet resources and personal observations.

I'm going to try to bring all of that together for you in this post. I've included links to places to purchase materials, photos, existing how to's, and videos.

What you'll need:
  • ¼" double braided yacht rope (here, here, and here)
  • paracord (here and here)
  • a lighter
  • scissors
  • a measuring tape
  • time and patience
For Q's head, I know I can get away with 18' of rope. For any other "horse" sized head though I would recommend starting with 20', larger horses 24' to be on the safe side. Once you master the technique, you'll be able to use less in the future.

Its best to measure the horse's head before you get started. Measurements of the areas highlighted in the below image from the Handmade Homestead are critical to have before you begin.

Visit Jen's (new) site for much more detail!


The best measurement is your horse, if you're able to tie the halter at or near the barn to measure on your horse as you go, that's you best bet for a perfect fit. Otherwise, you can always find a perfect fitting halter and model your new rope halter from it.

Okay, so you've got your rope in hand that is trimmed to the proper length, the ends are burned to prevent fraying, and your measurements written down and nearby, lets get started tying that halter!

: : : : :

Pick a point on the halter that leaves about 6½ to 7 feet of rope to one side and the remaining length on the long side.

Short end on left, long end on right


From that center point tie two overhand knots the distance you measured to be correct from your horse's nose.

Added overhand knots for noseband


And now, because these things can never be simple, lets knock out what is hands down the hardest part of this entire process: The Fiador Knot.

I've found the best directions for this knot to be here. However, as of November 2016, Homestead Tack has a NEW GREAT VIDEO that makes the tutorial I did here rather, moot, but as it keeps getting hits, I'm leaving it up. Following along with those directions, I've also provided photos below of my step by step for you.

First, lets get organized to follow the directions. That means flipping the point of view to where the center (what will become the top) of the noseband is closest to you and the two ends (short and long) are pointed away from you.

Second, to follow the directions the easiest, I find I prefer to make the "yellow" strand the "short" side. Or to rephrase to avoid confusion, the "short" side - left side - of my rope in these photos pairs with the yellow in the drawing.

And thirdly, when tying this knot with these directions I find it most important to focus on the intersections where the rope must pass over or under. Proceeding with the knot with that mind set, over, under, under, over, under, over, under, under, over, THROUGH, will make things a LOT easier.

Okay, lets proceed through those steps! (Don't worry, there are videos throughout to help you along.)

Step 1:


Step 2:


Step 3:


Step 4:
In this photo I've marked the two loops
that will create the area for you to snap
the halter to with black dots from a Sharpie.
I recommend marking them in some way
because when you proceed to the next step
things get confusing in a hurry.
Step 5:

This is the trickiest part! Hang in there!

Do your best to keep everything as FLAT as possible through this stage. If your long and short ends want to curl up as you pass them through, go slower and untwist them by spinning the rope between forefinger and thumb as you go. ALWAYS keep one hand over top of the entire knot as you pass the ends through. This will help keep everything in place. Flat, flat, flat. No twists or tangles. This. Is. Key.

In the drawing above, they show that you
should pass three parts of the halter through
the central hole. This is a demonstration of that.

In this photo I have passed the long and short
ends through.

In a continuation of passing everything through that central loop, this photo
shows the noseband beginning to pass through.

NOTE HOW FLAT MY KNOT IS. IF YOURS DOES NOT LOOK LIKE THIS
YOU ARE LIKELY TO HAVE ISSUE WHEN YOU TIGHTEN EVERYTHING UP.


Step 6:

Okay, now to pull everything through and tighten this sucker up! THIS IS THE WORST PART. Why? Because its the breaking point that will dictate whether you dressed everything well. If you botch it, guess what? You get to repeat everything above! YAY! Not. Repetition will teach you the knot though. I repeated every step prior to this probably a dozen times when I tied my first halter. Now I can tie them correctly on the first try as long as I'm tedious about making certain everything is lying as flat and neat as possible.

Start by noting the two marked loops where the lead rope snap will go. Very carefully bring these under and pinch them together.

Then grasp the 3 pieces - 4 strands - you passed through the hole. While holding all 4 of these in one hand (tightly) and alter your pinch of the other two into a stronger hold and pull everything in a manner that will tighten the knot.

Likely the knot didn't tighten all the way.

Now you have to finesse it. Tweak the top. Tweak the bottom. Here is a video for better explanation:


A properly finished knot will have the four strands at the top all close together with no rope between them as pictured below:

All four strands are flush together.

Note how all four strands are flush together and appear to disappear into the same area.

A properly tied Fiador knot.

So now you've got your knot tied all pretty, but its all wonky and the dimensions are off. PANIC! No. No. Don't panic. You just have some more finessing to do.

This part can be tricky, but its very doable if you're patient. If you're accustomed to tying knots and having to tweak them (summer camp skills, rock climbing, etc.) then this part won't be so bad. If this is your first time doing anything like this, don't worry! You'll get it.

Here is a video to help you through this:


: : : : :

If you aren't confused yet, congratulations. This knot is incredibly complicated and frustrating to learn. Time. Patience. Repetition. That's all that will help you through it. Unfortunately I'm not sure that I can provide much clearer direction without being there in person to help each of you through this. It's very complicated.

Troubleshooting with this knot - I've found - is almost always due to the knot not being properly "dressed" prior to pulling the three parts (short end, long end, nose band) through the center to complete the knot. "Dressing" a knot is to have it lying properly and orderly before you proceed with each step. Its something you come to gain a feel and an eye for as time progresses. As a rock climber, I've been introduced to a wealth of knots through the years that if improperly "dressed" can cause a load of grief. I've developed a feel and an eye for knots because of this.

The good news is that once you've completed the damn Fiador knot, the rest of the halter is a breeze!

Gathered from Homestead Tack here


Move from the Fiador to do another overhand knot (with both the long and short ends of the rope) the distance proper to fit your horse away from the Fiador knot. For Q this distance is about 7".

Noseband with Fiador ascending to overhand knot. Feline helper is optional.

From there position your "short" end on the backside (as the halter nose faces your left) and place the "long" end in the foreground. You're going to walk the "long" end through the whole frame of the halter to meet that "short" end at the finale.

Measure the distance from knot to knot to guarantee proper fit and make a loop and tie another overhand knot. This creates where you'll tie the halter off on the horse's head.

The loop is in the center of the photo.

Now measure out the distance for your cheek section.

This next part is a little bit tricky, but not nearly so much as the Fiador knot. You've got to pass the "long" end through the overhand knots on the noseband. To do this you're just going to follow through the knot you already tied. Loosen the knot just a little to allow passage of the end of the section you're passing through. The key to this is trying to keep the knot flat. You just pick one side of the first knot and stick to it as you go along creating a tandem look to the knot.


Loosened knot with cheek part passing through.

Dressing the knot. Note that it is flat.

Another shot of dressing the knot.


Dress this knot.

Pass the rope over the noseband so that you create a doubled up area along the top of the noseband and then repeat the tandem knot on this side, as well. Dress it and move on.

Now all you have left is one more overhand knot to tie both strands (short and long) of your halter together!

Match up the measurements from the first cheek and throatlatch and whip that knot into place. With any luck, your ends pair up fairly close! If not, then snip and burn the end of one.


Ta da!!

And PRESTO! You've got your very own rope halter!

Now wasn't that easy?! Ha, you're saying. As if. Tying these things is a b*tch.

From here you can do a variety of things to dress the halter up. If you're like me, many of you grew up tying hemp necklaces/anklets/bracelets. One of the knots used to tie the flat versions of these articles of jewelry is perfect for the noseband of your halter and will create the unique look you see featured on my horses' halters.

Pair this with some extra paracord looped around the head piece and you can add additional bling in the form of a browband (seen in the above photo of Q).

With some more patience and some 1" metal rings, you can create the halter-bridle I've made for Q (again, featured in the photo at the beginning of this post).

A sketch of the loopy action used to create the halter-bridle I ride Q in.
Blue pen - The halter you tied in the above steps
Blue rings - the 1" rings you buy to add.**
Red - the additional bit of rope (24" for Q) used to make the bosal/hackamore area.
** The two rings tied into the knots must be present from the very beginning when you tie this halter.

: : : : :
I recognize that this is a very difficult subject to confront in writing, but I've done my best. If anyone has further questions, comment and I'll do my best to help you. Its a pity we can't all teleport to the same location to run through the difficulties and provide hands-on help with the Fiador knot. Its easy to understand why people charge what they do for these halters!

I hope this post has helped some of you in some way.

Sunday, October 6, 2013

Equestrian Martha Stewart

In efforts to save money and avoid from spending inordinate amounts of money on things, I've made the following of late:

Halter bridle of the blaze orange variety


Q does not approve of this photoshoot
I finally made a pad rack <3 it
New *red* reins because I have yet to find retired orange climbing rope
I have minimized the amount of metal on these opting to tie instead of clamp

So now we're red and orange - visibility is what I'm striving for at this point
*note attached crupper and breastplate now, too!*
The only negative side of this saddle was lack of any D rings; I made my own
by attaching paracord to rings and looping them around the stirrup bars

I proceeded to get creative even more by creating a system - also attached
to the stirrup bars - to allow for attachment of a crupper to my treeless saddle

It turned out quite wonderfully

We won't have a slipping saddle any time soon!


If anyone would like to see a more detailed tutorial on any of these projects, let me know. All of them cost well under $20 each to create and some involved using recycled materials from former projects!

Saturday, April 21, 2012

Reading!

In the past couple months I've had the beautiful gift of TIME back in my life.  Ski patrol training is over, I have weekends for the first time in a LONG time, and I'm free to make plans and do things as I choose when I'm not at work.  Enter: crafts and reading.

I've been a voracious reader since elementary school.  We had a program at my school where you could read a book, take a quiz on it, and amass points for your memory about the book.  The length and difficulty of the book determined its point value.  Our teachers set goals for us for each nine-week period.  If we could meet a certain level of points we were rewarded with a trip to swim, ski, ice skate, bowl, snow tube, get pizza, see a movie, etc.  I'd always liked reading, so when this program started I was all "GAME ON, bitches!"  And ever since, I read like a champ.

But then college happened, and then ski patrol training, and mostly LIFE happened.  Reading became a dormant pasttime for me.  But, luckily, it's reared up back into my life.  I can't quite read 5 books at a time like I used to, but I've read more since February than I have in years!

A Dog's Purpose 


I enjoyed this book a lot and it really made me see Kenai in a whole new way.  The book anthropomorphizes a lot, but so what, it was fun and that was the point.  It tore at my heartstrings a few times and made me laugh aloud.  If you own a dog, love a dog, want a dog, I recommend it.

The Art of Racing in the Rain


I enjoyed this more than the first dog book.  I learned a little about car racing, a lot about love, and really enjoyed Enzo, the dog who tells the story.  It's one of those dog stories that makes you want to cry, (you know, like Where the Red Fern Grows or Marley and Me) but knowing how happy Enzo is at the end sort of makes them tears of joy.

The Summer Tree


Okay, I admit it, I'm a fantasy nerd.  This book was the first in a trilogy.  It started a little slow, in my opinion, but I really began to like it as it wore on.  I plan to read the other two this summer.  Its another quest book, but different from my true love series (The Belgariad and The Mallorean by David Eddings - the best fantasy books ever) it links our world to another.  An interesting twist on things.

The Twilight Series


Yeah, I gave in and read them all finally.  I really don't have a thing for monsters (vampires, werewolves, the like) but I was bored and knew they'd be quick reads - so I read them all.  I understand why people love them.  The way the author write about the love and intense relationships between the characters leaves us wanting that in our lives.  The grace and power that comes with being one of these monsters is also desirable.  However, I, in no way, desire to be a vampire, werewolf, etc.  Having a love like Edward and Bella would be enjoyable, yes, but BEING a vamp?  Nah.  And all that "Team Edward" "Team Jacob" shit, fo'gettaboutit.  This series is an entertaining read though.

Prodigal Summer


I'm currently re-reading this book - something I hope to do at the start of every summer.  I absolutely LOVE the characters and the descriptions of Appalachia.  I see facets of myself in each of the characters and the author manages to put into words some of the reasons why I love this part of the country so much.  This book makes my heart happy.

Among the Bears


I started this book on my Montana trip and am enjoying it.  I don't know if I will read the whole thing or not as it is dry, scientific reading to a degree.  It is very interesting though and told in a story-telling format.  After my brief work with black bears I find the work of this man to be more interesting than most.  Its an added bonus that it all takes place in the Appalachian mountains, too.


Friday, December 9, 2011

Crafffftttttttting

***THIS POST HAS BEEN INTERRUPTED TO BRING YOU THIS NEWS:  MY JOB HAS BEEN EXTENDED THROUGH SEPTEMBER 2012 (or as long as I can stay)  -squeal!-****


Since most the folks who I made these for have received them - and because I'm pretty sure  none of them read this blog anyway - it's safe to share now!

I did the bracelets for all of my equine friends for Christmas.  For the three ladies who have helped me a ton (since March mostly, though Sonya has been super-involved in my horse life since 2006 - she even gave me my first saddle/pad/bridle!) I made these:


Suzanne's is of her two most treasured horse things - her Arabian mare Reighnny and the beautiful new barn - that earth symbol is one of her favorite things, and it was a surprise from the barn builder, Charlie, to her (one of many surprise details on that barn).


Sonya's and Angie's are photos of their mares with this year's foals - both fillies.  The mother  with the palomino foal got EPM several years back.  I helped when she was better trying to get her to ride again, but hills - even the slightest incline - really hurt her.  So they decided to breed her.  And WHAT a pretty little girl, Kali, came out!  Bug, the sorrel mare, basically birthed her mini-me - in both appearance and temperament.  Except that now the formerly sorrel filly, Ziva, is a smutty palomino.  Can't wait to watch what these girls turn into!

These gifts were so fun (and easy!) to make.  I've still got some other projects lined up - for myself now.  I just need to get the sewing machine figured out!!

 : : :

In horse news:  Planning on heading out to see Stanley today and see if he feels like tooling around on those jumps a little more.  I punched some higher holes in my leathers to hopefully achieve a better position for it all.  We'll see!  Having fun is the goal.  And I know we can achieve that!

Thursday, November 24, 2011

Horsehair bracelets

I love horses.  I love crafts.  So why not combine the two?


Several of my favorite equine owning friends will have a sentimental gift to last the years.  Most bracelets only contain hair from one or maybe two horses.  One set (2) contains 4 different horses though!  I find those to be the prettiest.


These bracelets are simple - for now.  I have been practicing with hair + wire + turquoise/jade/etc. in addition to practicing a 5 stranded braid.  I've got a book on some of the SUPER DUPER complicated horsehair braiding, but hello, I barely have free-time as it is!  Maybe one day.  For now, these must suffice!