It's crazy to think that Starlight Lane Farm has been a part of my life for over a year now. I can say with absolutely zero hesitation that having the horses at home has been the greatest thing ever. Especially considering the current state of the world and the pandemic. (I'll never stop counting my lucky stars that I completed the project last year.)
I knew
when I announced the project's "completion" last year on the blog that I would still spend the better part of a year deciding on final organization for the space. And I have. And I will likely continue to improve and modify things as time goes on. I think that's just the nature of having horses at home though. There are always ways improve upon routines, whether they are improvements due to observations over time or simply a change in financial situations to allow for further investments (small or large).
My improvements
since my last post about barn glow-ups have been a result of both observations and monetary commitments. Though I'll admit that much of what I've done is a result of my creative MacGyvering. Anything to save money on my expensive hobby! (Or rather, guarantee that my limited equine budget has liberties in critical areas like vet care and diet.)
Originally, I thought I would post more frequently about my barn updates and hacks, but steady, consistent blogging simply isn't my reality these days. But maybe that's okay because one giant list is more satisfying to review - at least for me anyway. 😉
Rock "Patio" Around Water Spigot + Metal on Wall
This was a simple improvement project that just "came to me" one day as I was rinsing buckets this summer. Water inevitably splashes all about during various tasks around the spigot. This isn't a surprise and is not a big deal in the summer, but for the other three seasons, it could be something that makes life a bit more complicated. Additionally, the wood wall getting wet isn't a great thing long-term. The project didn't take much more than 30 minutes! I gathered the stones, placed them, settled the stonedust back around them, and screwed the metal to the wall. Big gains for not much effort!
 |
| All that alfalfa yuck on the stones is so much easier to clean than when it was on the stonedust! |
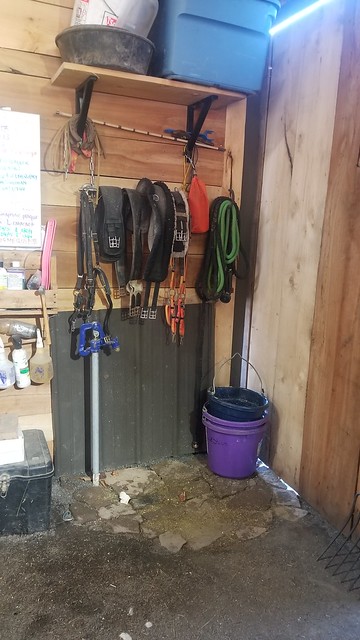
Saddle Rack by Cross Ties
This project was another quick one precipitated by wanting to make things smoother/easier when other people joined me to ride - especially my friends who are new to horse things. It's so much easier to just set out the tack I want people to use before they arrive. I had already built this rudimentary saddle rack for the back of my truck in 2017 and basically just transferred it to the barn.
 |
Very simple. Super basic.
|
 |
Does the trick though.
|
 |
| And is out of the way most of the time. |
Blanket Hangers
I love my swing-out blanket racks on my stall doors, but with their size and location they aren't ideal for drying my winter blankets and turnout sheets. They're very, very useful for my saddle pads though! So I picked up several basic hooks to put in my rafters to hang my winter blankets and turnout sheets.
 |
| The stepping stool makes putting them up and taking them down easy peasy. |
Liming of Second Pasture
In the spring, I limed the pasture closest to the house. This pasture had the most earth disturbance and was more "ready" to accept lime than the other pasture. So, I limed it first (with a buggy from Southern States) and opted to do the other later (by myself with a tiny spreader because the buggy proved to be too much trouble for a variety of reasons).
Later was supposed to be in the spring, but that turned into summer, which turned into fall. (Liming really is not one of my favorite farm activities I've learned lol.) But I did it! By hand! And will forever more only buy pelleted lime because powdered lime is a royal PITA to spread (something I had heard but really needed to experience to fully appreciate/understand).
 |
It wasn't hard or miserable work to spread the lime, just tedious AF.
|
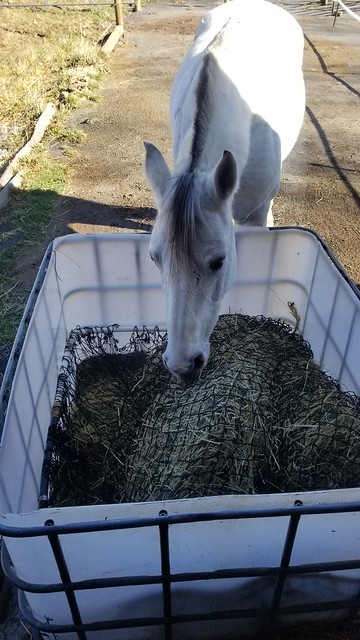
Hay Feeders in Stalls
As you're noticing, a lot of these improvements are things that will make my life (and the horses' lives) easier during the winter months. Last year, I moved the hay nets from their outdoor feeders into their stalls whenever the weather was inclement. Not the biggest deal in the world, but filling the nets can be a time consuming PITA made worse when they're frozen (my least favorite).
For our second winter in the barn, I wanted to have feeders both in the dry lot and in the horses' stalls. This way I can simply fill the inside nets and be done with it. I don't have the nets ordered or attached to these feeders yet, but I do have all of the stuff needed to complete the project once I get the nets.
The feeders are repurposed blue barrels I've hacked apart to my desire for various projects over the years. The nets will be attached to these feeders in similar fashion to the updates (below) to my outdoor feeders.
 |
It's bolted into the wall, don't worry.
|
 |
Bonus of the location is that when I do randomly bring them in during the summer with hay nets, all the scraps fall into the hay bin where they're much more likely to be eaten than if they were strewn about in the sawdust.
|
 |
Grif's will hold the same amount, the dimensions are just a touch different. When one works with scraps, one makes the best of the materials at hand lol.
|
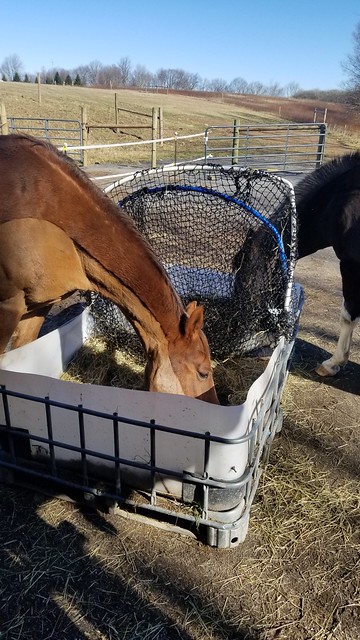
Improvements to Dry Lot Slow Feeders
These improvements were a long time coming to these feeders. Previously, the hay nets lined the inside of the feeders and were cinched closed with a drawstring/toggle/daisy chain. Opening/closing the drawstring top and daisy-chaining, while not horrible, was never fun in wet conditions and nigh impossible in wet-turned-frozen conditions. So, no more of that!
I've upgraded to pex-tubing frames for the nets that are attached to the inside of the feeders. They hinge open and closed very easily. Now it's a simple clip-clip of two carabiners, open, dump hay, clip-clip closed. Cutting out the few minutes I used to deal with the drawstring closure has made my standard barn chores (mucking/feeding) drop to about 10 minutes per session on nice weather days. (Precip always slows things down a bit...moreso when its frozen.)
 |
Grif demonstrating what a full hay bin with net attached to the frame looks like.
|
 |
Stan and Q's hay bins/frames are open here (and secured, don't worry).
|
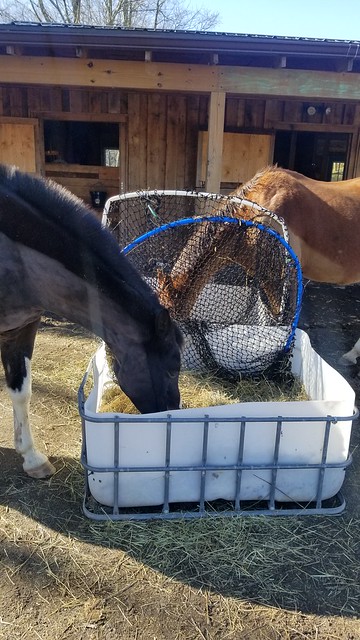 |
| For whatever reason, Grif manages to eat the same way out of his net now as he did before while Stan and Q struggle. The difference for the latter two is that their previous hack of picking the whole "bag" of netted hay out and shaking it about (it was attached to the feeder so wouldn't go far at all) doesn't work now. They're definitely getting enough to meet daily requirements, but they manage to generate a lot of "chopped" hay that stays at the bottom of the feeder. After two or three feedings, it builds up to the point where I opt to just pin the frames up for an hour or so to let them enjoy chopped hay of their own creation. |
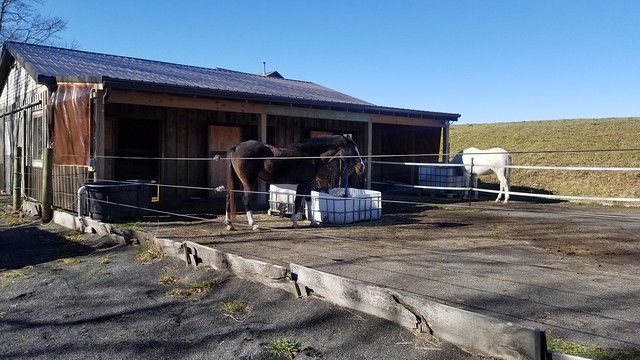
A Second Stock Tank
This one is pretty straight forward, and very needed once I split the horses up. In the summers, not a big deal because I have various buckets I can fill for Grif. But in the winter, things get trickier because I don't trust Grif with heated buckets. Last winter, I re-opened the dry lot with a baffle in the middle to help protect Griffin from bullying and prevent Stan from being a grade-A asshole about food/space all of the time. Everyone had access to non-frozen water, but Grif did get chased around more than needed despite the baffle. So this year, I knew I'd be buying him a smaller stock tank + heater for winter. It's arrived, in place, and ready for winter.
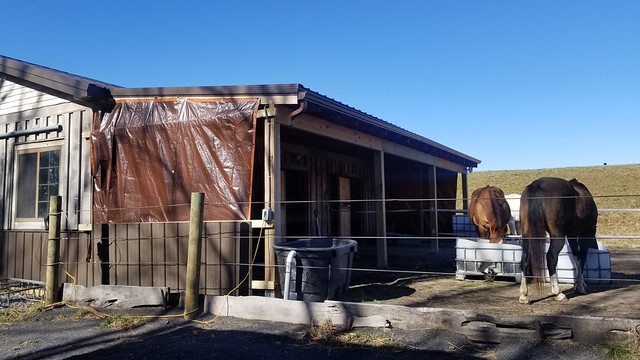
End Walls on the Dry Lot Overhang Area
And finally, the biggest update to the barn yet? Extending the barn "walls" into the overhang area to help cut back on windblown precipitation (frozen or otherwise). Originally, I'd planned to do a wooden frame and tarps only. But then I realized Dave had no plans for extra metal sheets from building the barn last year, so I built combined metal + tarp walls.
It's highly likely that [with time and finances] these walls will become permanent (and prettier). But for now, they definitely do the trick for providing a larger area out of the wind/precip for the horses. Ultimately, I want to see how the drifting snow is affected by the walls before committing to anything too ridiculous. Once I know more about how the walls will influence the snow, I've got plenty more metal sheeting and some additional burly clear plastic paneling Dave scrounged up to use toward my efforts. (I'd really like to have a solid wall that also allows some light through because I am already missing the extra light provided when that space was open.)
 |
While I had a rudimentary idea in mind going into this project, I 110% made it up as I went along. And I'm not gonna lie, it turned out way better than I expected for bullshitting my way through it lol
|
 |
Due to the angle of the overhang roof line, the tarps are not a perfect fit. But whatever. They're secured with lots of screws and washers at a lot of different points and will hopefully withstand a season of weather.
|
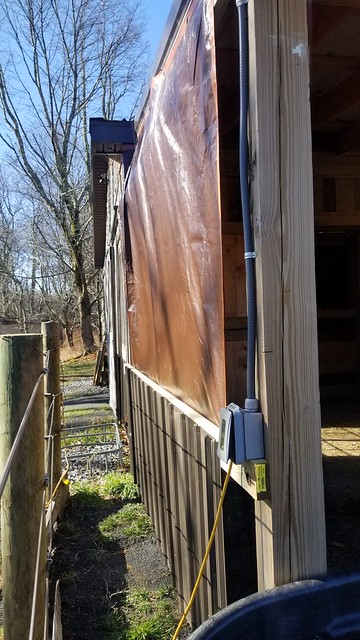 |
I really don't love the tarp look, but it's functional for now.
|
 |
Definitely looks nicer the further away you are lol!
|
 |
| But despite the less-than-pleasing aesthetics of tarps, they're already making a big difference on windy days. |