
To help alleviate costs, I MacGyver shit whenever I can.
On the endurance front:
- Needed a saddle cart for endurance...those suckers run close to the $200 bracket. I crafted one for $50.
- I love my saddle, but it did not have rigging for breastplate or crupper attachments. I crafted those from spare things around the barn and my craft bin for free.
- My knees and ankles were experiencing undo stresses from the lack of stirrup turners. Stirrups with an offset eye are expensive and hard to find in the caged, padded endurance variety and the other option, commercially made stirrup turners are costly and the design looked like it wouldn't work for me. So I once again crafted myself some from spare things for free.
- *Not MacGyver'd* but still worth mention, I recently contracted a leather maker to help me resolve my stirrup leather issue after the thin leathers caused a lot of pain in the soft tissues along my shin. The gentleman I contacted knew just what I needed and made me custom tunnel-backed fenders!
- Using mule tape, rope, and cones coupled with a civil engineering measure wheel, I have my own dressage arena.
- I scavenge PVC pipes from wherever I can to add to my ground pole/jump pole arsenal. I have six 10', three 8', and three 5' poles now that can be paired a myriad of ways with my 3 jump standards (by Mike Turner) and cavaletti that an ex helped me make.
I'll do a post at a later date on the jumping/dressage stuff, as I have no good photos right now and no time to get any pre-OD 100.
---
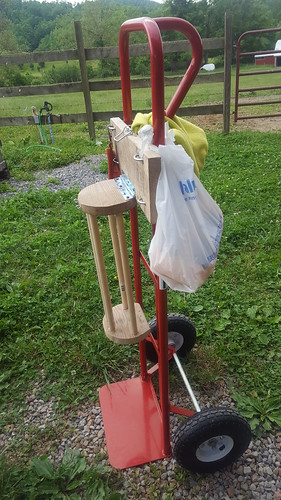
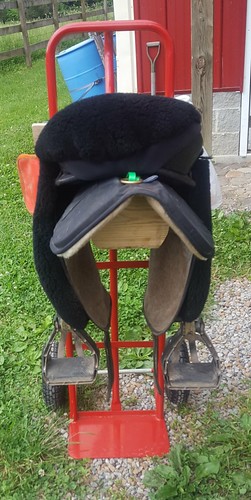
Saddle Dolly
About a year ago, I Googled "DIY saddle rack/DIY saddle cart" and found a lot of interesting images. A lot of them required a lot of wood and a lot of craftsmanship and would result in a rather heavy product. I'm crafty and I date a general contractor who has the skillset to do these things, but the time and materials needed for most of this stuff was not going to make it very worth it in the end for what I really needed - something to make toting my saddle/bridle around ride camp and holds a lot easier.One design however, really caught my eye. It was a handtruck (I call them dollies, it may be my WVian coming how, but whatever) with a metal saddle rack clamped onto it. Hmm...that got my brain whirring. This idea would be very affordable and very easy to implement IRL. It may not be as stable in all conditions as a cart would, but it will work in 90% of the situations I'll need it for!
It took time (and really, the impetus of a 100 mile ride with all away holds), but I finally ventured forth to Harbor Freight and purchased a dolly for $42. It's rated to 600 lbs and has great "off road" tires on it as opposed to many that lack tread and are meant for use in a more urban industrial setting.
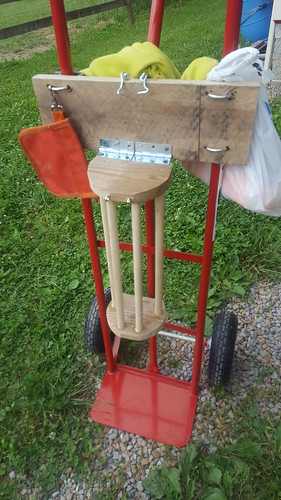
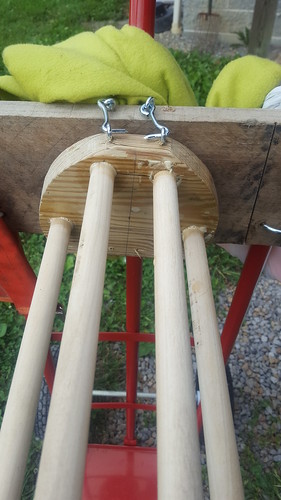
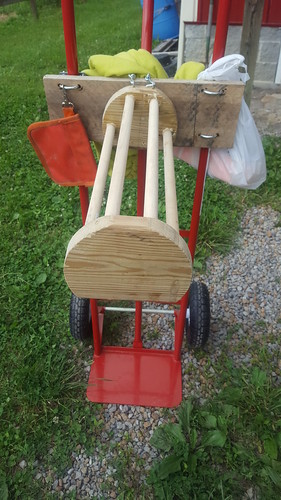
I had zero plans to use the original idea of a metal saddle rack as I knew I had a perfectly good wooden one that had originally been crafted to go inside my tack locker, but I never use it in there. I purchased some U-bolts, scavenged a board from the burn pile at the barn, bolted the board to the top part of the dolly, and then hinged the saddle rack to the board. I added some hook & eye gate latches to hold the rack in the upward (usable) position, and voila! A portable saddle rack!
Things I will also be adding, but haven't as of this writing: hooks for bridle/reins/breastplate and a muck bucket at the base that will be bungeed in place (and can hold sponges/scrapers and water). The bucket should make it even more stable.
 |
| Totally already have stuff hanging off of it. |
 |
| U-bolted to the dolly and hooks to bring the saddle rack to the UP position |
 |
| Hooks engaged! |
 |
| Plenty of space to bungee a muck bucket with water @ base |
 |
| Wheels the saddle around like a champ! Still need to add a few more hooks for bridle/breastplate |
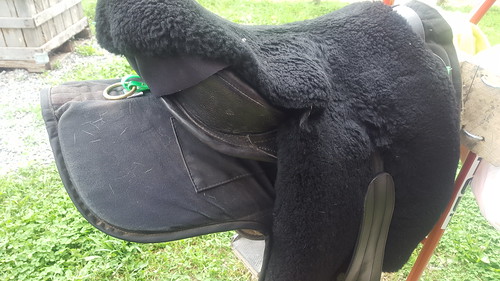
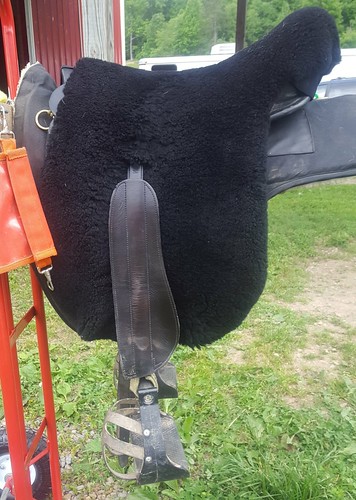
Saddle Rigging
Originally, all of this rigging was done with rings and paracord. However, the crupper ring really needs to be a solid placement, and paracord is not static line. In the rope world, you've got static or dynamic ropes. Static do not stretch (especially useful for those who are arborists) and dynamic have some give to them (we use these in the rock climbing world because when you take a fall you don't want to get jerked to a hard, sudden stop). I obviously don't want my saddle to stretch away from my crupper, so I needed to resolve the issue.Enter biothane, a very static material!
I bought a lime-green sponge leash at the AERC convention several years back. It was a sponge leash for a year, then I cut the stitching and it became a throat latch on a bridle of random biothane pieces for Griffin. And now, it's undergone another Frankenstein operation to become my crupper attachment! This final transformation involved some additional conway buckles and drilled holes into the biothane, but overall, it seems to be a great design.
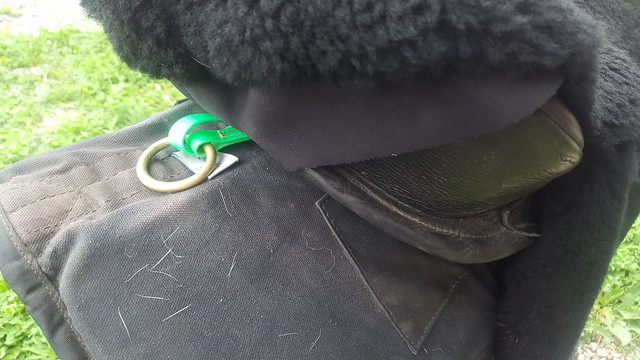 |
| New crupper ring. You can see original stitching (near) vs. the bigger loop that goes to conway buckle (far) |
 |
| Zoomed out to show positioning. |
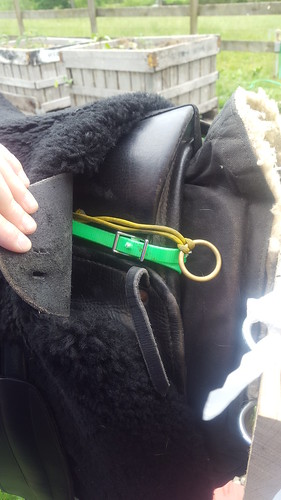 |
| The biothane goes under the saddle to loop up and hook around the stirrup bars. The yellow paracord also hooks around the stirrup bar, as well, and this is how I attach my breastplate to the saddle. |
Stirrup Turners
Ages ago, Nicole had purchased some commercial stirrup turners. She noted (as other on online reviews have also said, I've noticed since) that the hardware used to make the loop dug into her ankle and ultimately created a new issue even though it solved the original one.I started turning over ideas in my mind for how I could craft stirrup turners of my own that didn't include any hardware that could dig into my leg. It would need to be minimalistic, too.
I settled on tubular webbing with a segment of a dowel rod for rigidity slipped inside, and then sewed with heavy duty wax thread. (Okay, the original design involved velcro, but that obviously didn't work.)
The inevitability of mud and dirt does weaken the threads over time and I have had to resew a few times, but overall, I'm really pleased with the design. If I had access to an industrial sewing machine, these would easily be improved and far more bombproof, but alas, I have no such access and I'm pretty certain my mother would shoot me in the foot if I tried to do this with her machine (which isn't quite rated for this type of thing)!
I've been using these things for about 2 years now and have had to repair (resew) one or the other 3 to 4 times during that period. Not a bad go of it, really, when you consider the # repairs/time period. Considering they literally cost me nothing to make and they've completely resolved the issues I had prior to their existence, I'm psyched with them.
 |
| Tubular webbing, dowel rod on top through Wintec webber |
 |
| Hand stitched below. |
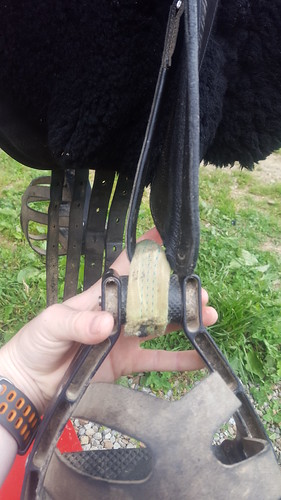
Tunnel Backed Fenders
I've struggled with pain in my lower legs from endurance riding more than any other kind of soreness. When I've ridden in other people's saddles that have wider stirrup leathers (Jen's Boz for instance, which has a 2.75" wide leather) I didn't even have a tickle of pain like I'll get from my saddle. I have tried padding out the lower half of my fenders with pipe insulator and fleece sleeves to hold those in place, but ultimately, it was too much under my leg.No Frills this year was The Worst. Around mile 9 something across my right shin literally felt like it *snapped*. Not bone, but soft tissue. I had very sharp, severe pain in that moment that lasted for quite awhile. (I had the pipe insulator nonsense going on at this ride.) At the hold, when I could finally inspect my legs closer, I found a ridiculous amount of swelling and edema from the medial aspect of my leg across the front of my shin on my right leg. Whoa... I've never witnessed that kind of edema on my body before. It was pretty crazy. I suspect my high socks may have played into it! (My change of clothes included an entirely new wardrobe that had ankle socks instead of high socks at this hold.)
For the rest of the ride, my right leg would plague me. After that initial snap of pain (a 7 or 8 out of 10 on the pain scale for me), the pain would remain around a steady 3-4 on the pain scale with occasional spikes to 5. We took a lot of walking/grazing breaks though for the rest of the ride, which helped a lot. The rest of the time, I relied on my sheer stubbornness and desire to finish. the. ride. to get me through. I knew being able to finish was the only thing I could do to resolve the issue because being OUT of the saddle and on the ground was the only thing that resolved the pain.
Post ride, I had impressive swelling on that shin and even now (6 weeks later) I still have a slight deformity (bump) on my shin that was never there before.
Obviously, I HAD to resolve the issue before my 100...and the rest of my endurance career! Riding with pain BLOWS.
I reached out to a leather craftsman in Indiana who'd been recommended to me by Austen. He'd made a rolled leather collar for Kenai earlier this year that I love and is known for stirrup leathers, so it seemed like a great place to start.
After some conversations about the whole ordeal, he told me tunnel backed fenders would be the best bet. Within 10 business days of my custom order, I had them! And so far, they've been absolutely amazing. I love them. The 100 will be the ultimate test, and I'm very optimistic we'll get along just fine!
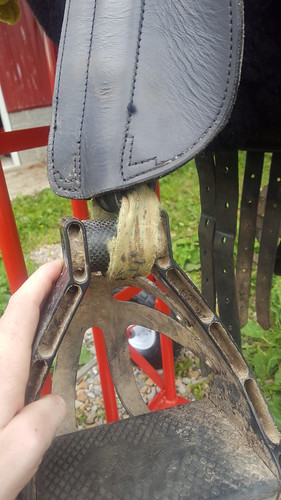
 |
| Love them. You can also see how the stirrup turner plays into the whole picture. You can see that I've used and abused these fenders some already! I need to polish everything up pre-100. |
---
There you have it! Some of my endurance-based MacGyvering.
Cool ideas. I bought the stirrup turners and they didn't fit my stirrups so I never got to use them. I'll have to try to follow your guide and make my own.
ReplyDeleteHoller if you'd like further instruction on what I did! It is pretty straight forward overall. And you're the Equestrian Craft Queen, so I bet you'll figure something out easily! =)
DeleteWhat exactly is the material you're using and where would I purchase it?
DeleteThe tubular webbing? A climbing shop or REI.
DeleteYay Gary! His stuff is so awesome :)
ReplyDeleteCaptain Diagnosis (Aka: Christian) suggests you just irritated some fascia, which had to hurt like hell. I think I did something similar when I accidentally dropped my end of a picnic table on my shin in high school. 0 out of 10. Do not recommend.
"0 out of 10. Do not recommend." LMAO. Yeah...that doesn't sound recommendation worthy at all!
DeleteInteresting hypothesis on the fascia! Definitely sounds plausible to me.
(PS - when you ride in August, feel free to bring your saddle or whatever you're comfy in to ride Q. If the fit is atrocious, I'll ride my Wintec and you can use my Ansur, but I bet we'll make due.)
I <3 your DIYs!!!
ReplyDeleteLove those new fenders! I may have to look into those in the future if my current set-up stops working or I wind up with a saddle that needs a more "fender-y" set-up.
ReplyDeleteNo more shin pain! 100 mile test of truth proved they work great.
DeleteThe dolly is brilliant, kudos!!
ReplyDeleteNice projects, horse DIYs for the win :) I've made stirrup covers, paracord reins, weighted rump rug, rope halters, bitless bridle, running martingale, fleece saddle cover, bareback pad, sponge leash....and probably some other things lol I'm always game for a new crafting idea.
ReplyDelete#EquineDIY FTW!
ReplyDelete