
 |
| Q modeling her halter-bridle I tied |
Tying your own halter is a hot subject among many horse folk, sadly, this art is complicated and resources are far-spread on the internet. I posted a few weeks ago about my time as an Equestrian Martha Stuart to save money on things I "needed" for my horses. I received a few inquiries on that post about how-tos. Also since that post, I taught Saiph to tie halters in the manner I've taught myself through various internet resources and personal observations.
I'm going to try to bring all of that together for you in this post. I've included links to places to purchase materials, photos, existing how to's, and videos.
What you'll need:
- ¼" double braided yacht rope (here, here, and here)
- paracord (here and here)
- a lighter
- scissors
- a measuring tape
- time and patience
Its best to measure the horse's head before you get started. Measurements of the areas highlighted in the below image from the Handmade Homestead are critical to have before you begin.
 |
| Visit Jen's (new) site for much more detail! |
The best measurement is your horse, if you're able to tie the halter at or near the barn to measure on your horse as you go, that's you best bet for a perfect fit. Otherwise, you can always find a perfect fitting halter and model your new rope halter from it.
Okay, so you've got your rope in hand that is trimmed to the proper length, the ends are burned to prevent fraying, and your measurements written down and nearby, lets get started tying that halter!
: : : : :
 |
| Short end on left, long end on right |
From that center point tie two overhand knots the distance you measured to be correct from your horse's nose.
 |
| Added overhand knots for noseband |
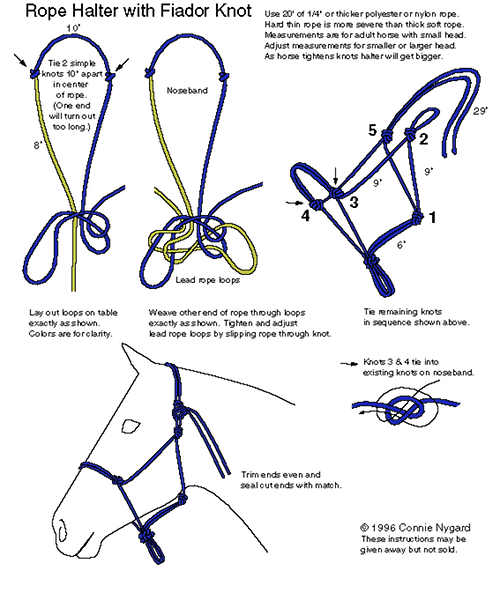
And now, because these things can never be simple, lets knock out what is hands down the hardest part of this entire process: The Fiador Knot.
I've found the best directions for this knot to be here. However, as of November 2016, Homestead Tack has a NEW GREAT VIDEO that makes the tutorial I did here rather, moot, but as it keeps getting hits, I'm leaving it up. Following along with those directions, I've also provided photos below of my step by step for you.
First, lets get organized to follow the directions. That means flipping the point of view to where the center (what will become the top) of the noseband is closest to you and the two ends (short and long) are pointed away from you.
Second, to follow the directions the easiest, I find I prefer to make the "yellow" strand the "short" side. Or to rephrase to avoid confusion, the "short" side - left side - of my rope in these photos pairs with the yellow in the drawing.
And thirdly, when tying this knot with these directions I find it most important to focus on the intersections where the rope must pass over or under. Proceeding with the knot with that mind set, over, under, under, over, under, over, under, under, over, THROUGH, will make things a LOT easier.
Okay, lets proceed through those steps! (Don't worry, there are videos throughout to help you along.)
Step 1:


Step 3:


Step 4:


 |
| In this photo I've marked the two loops that will create the area for you to snap the halter to with black dots from a Sharpie. I recommend marking them in some way because when you proceed to the next step things get confusing in a hurry. |
This is the trickiest part! Hang in there!
Do your best to keep everything as FLAT as possible through this stage. If your long and short ends want to curl up as you pass them through, go slower and untwist them by spinning the rope between forefinger and thumb as you go. ALWAYS keep one hand over top of the entire knot as you pass the ends through. This will help keep everything in place. Flat, flat, flat. No twists or tangles. This. Is. Key.
 | |
| In the drawing above, they show that you should pass three parts of the halter through the central hole. This is a demonstration of that. In this photo I have passed the long and short ends through. |
 |
| In a continuation of passing everything through that central loop, this photo shows the noseband beginning to pass through. NOTE HOW FLAT MY KNOT IS. IF YOURS DOES NOT LOOK LIKE THIS YOU ARE LIKELY TO HAVE ISSUE WHEN YOU TIGHTEN EVERYTHING UP. |
Step 6:
Okay, now to pull everything through and tighten this sucker up! THIS IS THE WORST PART. Why? Because its the breaking point that will dictate whether you dressed everything well. If you botch it, guess what? You get to repeat everything above! YAY! Not. Repetition will teach you the knot though. I repeated every step prior to this probably a dozen times when I tied my first halter. Now I can tie them correctly on the first try as long as I'm tedious about making certain everything is lying as flat and neat as possible.
Start by noting the two marked loops where the lead rope snap will go. Very carefully bring these under and pinch them together.
Then grasp the 3 pieces - 4 strands - you passed through the hole. While holding all 4 of these in one hand (tightly) and alter your pinch of the other two into a stronger hold and pull everything in a manner that will tighten the knot.
Likely the knot didn't tighten all the way.
Now you have to finesse it. Tweak the top. Tweak the bottom. Here is a video for better explanation:
A properly finished knot will have the four strands at the top all close together with no rope between them as pictured below:
 |
| All four strands are flush together. |
 |
| Note how all four strands are flush together and appear to disappear into the same area. |
 |
| A properly tied Fiador knot. |
So now you've got your knot tied all pretty, but its all wonky and the dimensions are off. PANIC! No. No. Don't panic. You just have some more finessing to do.
This part can be tricky, but its very doable if you're patient. If you're accustomed to tying knots and having to tweak them (summer camp skills, rock climbing, etc.) then this part won't be so bad. If this is your first time doing anything like this, don't worry! You'll get it.
Here is a video to help you through this:
: : : : :
If you aren't confused yet, congratulations. This knot is incredibly complicated and frustrating to learn. Time. Patience. Repetition. That's all that will help you through it. Unfortunately I'm not sure that I can provide much clearer direction without being there in person to help each of you through this. It's very complicated.
Troubleshooting with this knot - I've found - is almost always due to the knot not being properly "dressed" prior to pulling the three parts (short end, long end, nose band) through the center to complete the knot. "Dressing" a knot is to have it lying properly and orderly before you proceed with each step. Its something you come to gain a feel and an eye for as time progresses. As a rock climber, I've been introduced to a wealth of knots through the years that if improperly "dressed" can cause a load of grief. I've developed a feel and an eye for knots because of this.
The good news is that once you've completed the damn Fiador knot, the rest of the halter is a breeze!
 |
| Gathered from Homestead Tack here |
Move from the Fiador to do another overhand knot (with both the long and short ends of the rope) the distance proper to fit your horse away from the Fiador knot. For Q this distance is about 7".
 |
| Noseband with Fiador ascending to overhand knot. Feline helper is optional. |
From there position your "short" end on the backside (as the halter nose faces your left) and place the "long" end in the foreground. You're going to walk the "long" end through the whole frame of the halter to meet that "short" end at the finale.
Measure the distance from knot to knot to guarantee proper fit and make a loop and tie another overhand knot. This creates where you'll tie the halter off on the horse's head.
 |
| The loop is in the center of the photo. |
Now measure out the distance for your cheek section.
This next part is a little bit tricky, but not nearly so much as the Fiador knot. You've got to pass the "long" end through the overhand knots on the noseband. To do this you're just going to follow through the knot you already tied. Loosen the knot just a little to allow passage of the end of the section you're passing through. The key to this is trying to keep the knot flat. You just pick one side of the first knot and stick to it as you go along creating a tandem look to the knot.
 |
| Loosened knot with cheek part passing through. |
 |
| Dressing the knot. Note that it is flat. |
 |
| Another shot of dressing the knot. |
Dress this knot.
Pass the rope over the noseband so that you create a doubled up area along the top of the noseband and then repeat the tandem knot on this side, as well. Dress it and move on.
Now all you have left is one more overhand knot to tie both strands (short and long) of your halter together!
Match up the measurements from the first cheek and throatlatch and whip that knot into place. With any luck, your ends pair up fairly close! If not, then snip and burn the end of one.
 |
| Ta da!! |
And PRESTO! You've got your very own rope halter!
Now wasn't that easy?! Ha, you're saying. As if. Tying these things is a b*tch.
From here you can do a variety of things to dress the halter up. If you're like me, many of you grew up tying hemp necklaces/anklets/bracelets. One of the knots used to tie the flat versions of these articles of jewelry is perfect for the noseband of your halter and will create the unique look you see featured on my horses' halters.
Pair this with some extra paracord looped around the head piece and you can add additional bling in the form of a browband (seen in the above photo of Q).
With some more patience and some 1" metal rings, you can create the halter-bridle I've made for Q (again, featured in the photo at the beginning of this post).
 |
| A sketch of the loopy action used to create the halter-bridle I ride Q in. Blue pen - The halter you tied in the above steps Blue rings - the 1" rings you buy to add.** Red - the additional bit of rope (24" for Q) used to make the bosal/hackamore area. ** The two rings tied into the knots must be present from the very beginning when you tie this halter. |
: : : : :
I hope this post has helped some of you in some way.
Hi Liz, nice tutorial! I'm Jen from Handmade Homestead, now the Homestead Tack Shop. I want to let you know that you can grab the images to fix your tutorial off my site on the halter sizing page: http://homesteadtack.com/sizing/
ReplyDeleteYou also may be interested in how I tie my rope halters, that tutorial is here: http://homesteadtack.com/tie-a-horse-rope-halter/
Hey, Jen! Thanks for reaching out! I had given up fixing any links. I'll update the post and send them your way for more help =)
Deletethanks
ReplyDelete